


Tadelakt pillars inside and out, Fibercrown mouldings installed by and painted to resemble limestone. Italian lime plaster inside and out, antique mouldings, stencils, lath and plaster domes finished in silver leaf even the fountain base was finished by our hands. This house will be one to beat in our book of projects, a true masterpiece and an amazing group of people pulled this all together.
Italian Villa Lime Plaster Full Interior & Exterior Vancouver BC from darrell morrison on Vimeo.
Tadelakt pillars inside and out, Fibercrown mouldings installed by and painted to resemble limestone. Italian lime plaster inside and out, antique mouldings, stencils, lath and plaster domes finished in silver leaf even the fountain base was finished by our hands. This house will be one to beat in my book of projects, a true master piece and an amazing group of people pulled this all together.
-The Villa Work Performed-
-Exterior-
Two tone venetian lime plaster exterior
Install all fibercrown foam mouldings on exterior of house including arches windows and base.
Lime paint all mouldings to resemble lime stone
Tri-color Tadelakt lime plaster pillars
-Interior-
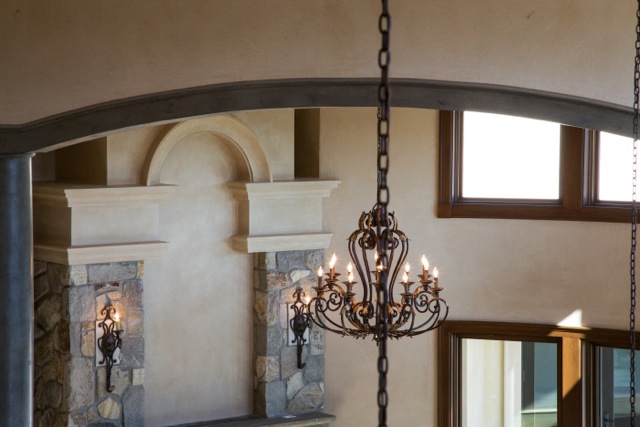
Smooth Venetian plaster walls including all ceilings and walls throughout house
Main interior fireplace install fibercrown, float substrate plaster to resemble walls and carved limestone
Plaster pillars and arches in Tadelakt with glaze and wax for an aged look
All domes finished in lath and plaster then decorated with silver leaf.
All wood beams on interior wood grained
We recently finished this detailed interior using venetian plaster in this beautiful traditional home, infused with tuscan details. The owners wanted a house built using environmentally safe products, however they were not aiming for LEED points. We used low voc colorants designed for this project and soap wax’s for sealing all the surfaces. Venetian plaster is a great alternative to paint materials as its surface does not show ware easily and its depth and beauty spark conversation. All the ceilings throughout the project were finished with a 2 tone Tadelakt lime plaster. The base boards, crown mouldings and stair kicks are finished in a pitted plaster finish to give the look of solid stone. I hope you enjoy viewing this project just as much as we enjoyed helping create it.


We have been working on this Tuscan Villa in the country since last summer. With 3 decks, 30 pillars finished in a smooth polished tri-color Tadelakt. Fiber-crown mouldings installed by us and Lime painted to resemble real limestone and all the exterior walls are finished in Intonachino Italian Lime plaster.


This is how the project evolved while we worked there


This lovely Mediterranean home on the cliffs on White Rock, British Columbia was a treat to work in. Every wall and ceiling in the common areas are treated with an Italian Lime plaster finish. The ceilings hand troweled technique was a lightly textured Intonachino tinted to Cloud White CC-40.
The walls robust in yellow tones keeping true to Mediterranean styling while smooth and slightly shiny brought life to this home.


venetian plaster walls and ceilings by darrell morrison

Venetian Lime Plaster Vancouver BC
This next round of photos is durning the construction of the Mediterranean Villa.


With over 10,000 sq. ft of Natural Italian Lime plaster sprawling through corridors, stairwells and the 3 levels of this home walking through the door you are transported to a far away place in a Mediterranean Countryside.
Thanks for Reading Darrell Morrison
The process, the projects, the finished product: This is an inside look into how I create my Venetian plaster projects, making them come alive.
In this video, you’ll see steps used to create my Venetian plaster projects, including completed project photos of Classic, Carrara, Intonachino and Tadelakt plaster applications.
When it comes to my projects, it’s Stucco Italiano Italian lime plaster that is my one and only choice, and I think this video shows you why. When you think interior stucco think Authentic lime based Venetian plaster.

What makes a beautiful Lime plaster finish so unique? In my opinion its the architecture and interior design taste of the clients. With clients in Burnaby, Vancouver, White Rock and all over the Lower Mainland, Architecture and Interior design is always changing. Lime plaster is the perfect material of choice that follows. Think custom fireplaces, feature walls or even full interiors Lime plaster projects.
Does your master bedroom have Architecture with curves like these? Italian Lime plaster is just the thing to bring these walls to life.

Does your style scream for a Tuscan Venetian plaster like this house?

Possibly you have a fireplace that has been needing the recent uplift. Could you dream of a sleek fireplace in Tadelakt Lime plaster?

Lime plaster has been my choice of material for almost a decade now. Recently someone told me it takes 10,000 hours to become proficient at any trade whether it be carpentry, framing or even a stone mason, the time spent honing that skill will one day make you a tradesman (or tradeswoman).
Over the summer I have been fortunate to work on a project in an Old World Italian Design Tuscan Villa. Breaking into my crate of techniques from WoodGraining, GoldLeafing, Venetian Plastering, Lime Painting and Stencilling. I have been challenged in ways that excite my mind and creativity, opening a new chapter in my life and the world I love to call Italian Plastering.
Here are some photos from this recent journey, the project is still in progress.


WoodGraining base coat

WoodGraining complete

Fibre Crown is a foam moulding used to simulate stone and in most situations is painted with acrylic paints.

Here is a close up of the foam moulding

Lime Painted Fibre Crown Moulding To Simulate The Look Of LimeStone


Fibre crown molding Lime stone 2 before & After

When you’re a guy working in the building trades, it’s not very often you get to travel for work, let alone work in a place like Banff, Alberta. This fantastic retreat in the mountains has been a dream-like project for me, and I’m happy to share with you this video of a walk-through of how the project’s coming.
As the build got further along, more plaster work got added to my slate. I love an owner getting excited about my technique and wanting more as the work progresses, especially in a place like this. By the end, Stucco Italiano’s Italian plaster was used throughout, stretching from the bottom up to the third floor.
Please set your viewing to high-def for all the detail!
Take a look at the waxed deep magenta plaster walls in the powder rooms, which includes that awesome entry feature and incorporates those subtle smooth textures across the walls and ceilings, on all floors.
Why would you want to use Italian plaster over both walls and ceilings? You have to consider the characteristics. No paint will match the beauty or durability over the long-term like Italian lime or Venetian plaster, and when you’re creating a mood in a room, why would you neglect the ceiling?
When the colour is fortified right off the bat, as I hand-mix plasters for application, including base coats, it gives a rich layered finish that doesn’t look man-made — it looks like it just belongs that way. It’s natural, rustic, and amazing for creating a mood in big and small spaces.
Lime plaster builds an atmosphere you just can’t get with only paint, and I’m a painter saying that.
When you’re talking about any kind of art or space, lighting means everything, and it’s definitely true with Intonachino plaster approaches I use in my Venetian/Italian lime finishes. As light moves across the room, during dusk through to dawn, and the light shifts from season to season, it changes the way the plastered surface appears, and you’ll always notice something different. It’s almost like your walls are a living part of your space.
This video will provide a perspective on the feel created with these finishes, but if the same video was shot at different times of day, you’d get more a sense of why I say that lightning — natural or electrical — is plaster’s best friend.
It’s been a while since this amazing journey began. Have a look at how far we’ve come, and how this plaster came to life. Click here to see the beginning blog posts.
Another week has come and gone, and I’m a week behind on my blogging — with pretty good reason, too!
My crew has been working really long days and straight through their weekends in order to keep up with production on the house, since the trades are all making huge advances these days, and there are a lot of pictures to prove it.
If this is the first time you’re dropping in to looking at this project, I’d suggest going back to the beginning of this amazing Rocky Mountains Italian lime Venetian plaster project in Banff, right here.

I’ve been loving the level of work from everyone involved in this project. Get a load of this amazing buffalo design in the stone flooring, at the main entrance.
It’s almost like a giant puzzle, isn’t it? I bet there’s a lot of people who’d love to put a puzzle this size together, but I sure wouldn’t. The precision needed to lay this tile is a pretty rare skill, even at this level of the game.
Talk about a mistake getting set in stone… Not for me, thanks. I’ll leave that to the pros.

Here’s another look at the stone buffalo, from the second floor.
A little trivia for you: Did you know that Alberta’s home to one of the two last continually wild North American buffalo herds?


Ahh, the boring world of drywall… but progress here means moving on to what we love, the plastering.


Details are critical with a masterful build like this one, where everyone’s brought their A++ game. Here’s Kelvin getting all those reveals smooth and level. It’s looking great, and we know he’ll keep it up.

The beams in the master bathroom are installed now, getting closer to a finished look.

The outside of this place is getting just as much detail work as in the inside. Here are some shots of the exterior. Now this is some serious craftsmanship going on here.


Here’s one of my favourite areas of the whole build: the back patio, with its massive fireplace.
Can you imagine summer nights, friends, wine, a fire crackling, and those towering evergreens all around?

All work and no play makes Darrell and the boys unhappy. I’m no dummy, we can’t have that! No trip, not even a work one, to Banff, Alberta, is complete without hitting the local slopes. Here’s us, off to Sunshine Village for a little powder action.

Sometimes accidents happen… Would you believe a darn tree just jumped right out at me? 🙂

Thanks for sticking around as my epic work adventure continues.
Stay tuned for more soon!
Cheers,
Darrell Morrison
Office:: 604.628.7855 | Direct:: 604.779.4233 | 9am to 5pm Monday – Saturday

