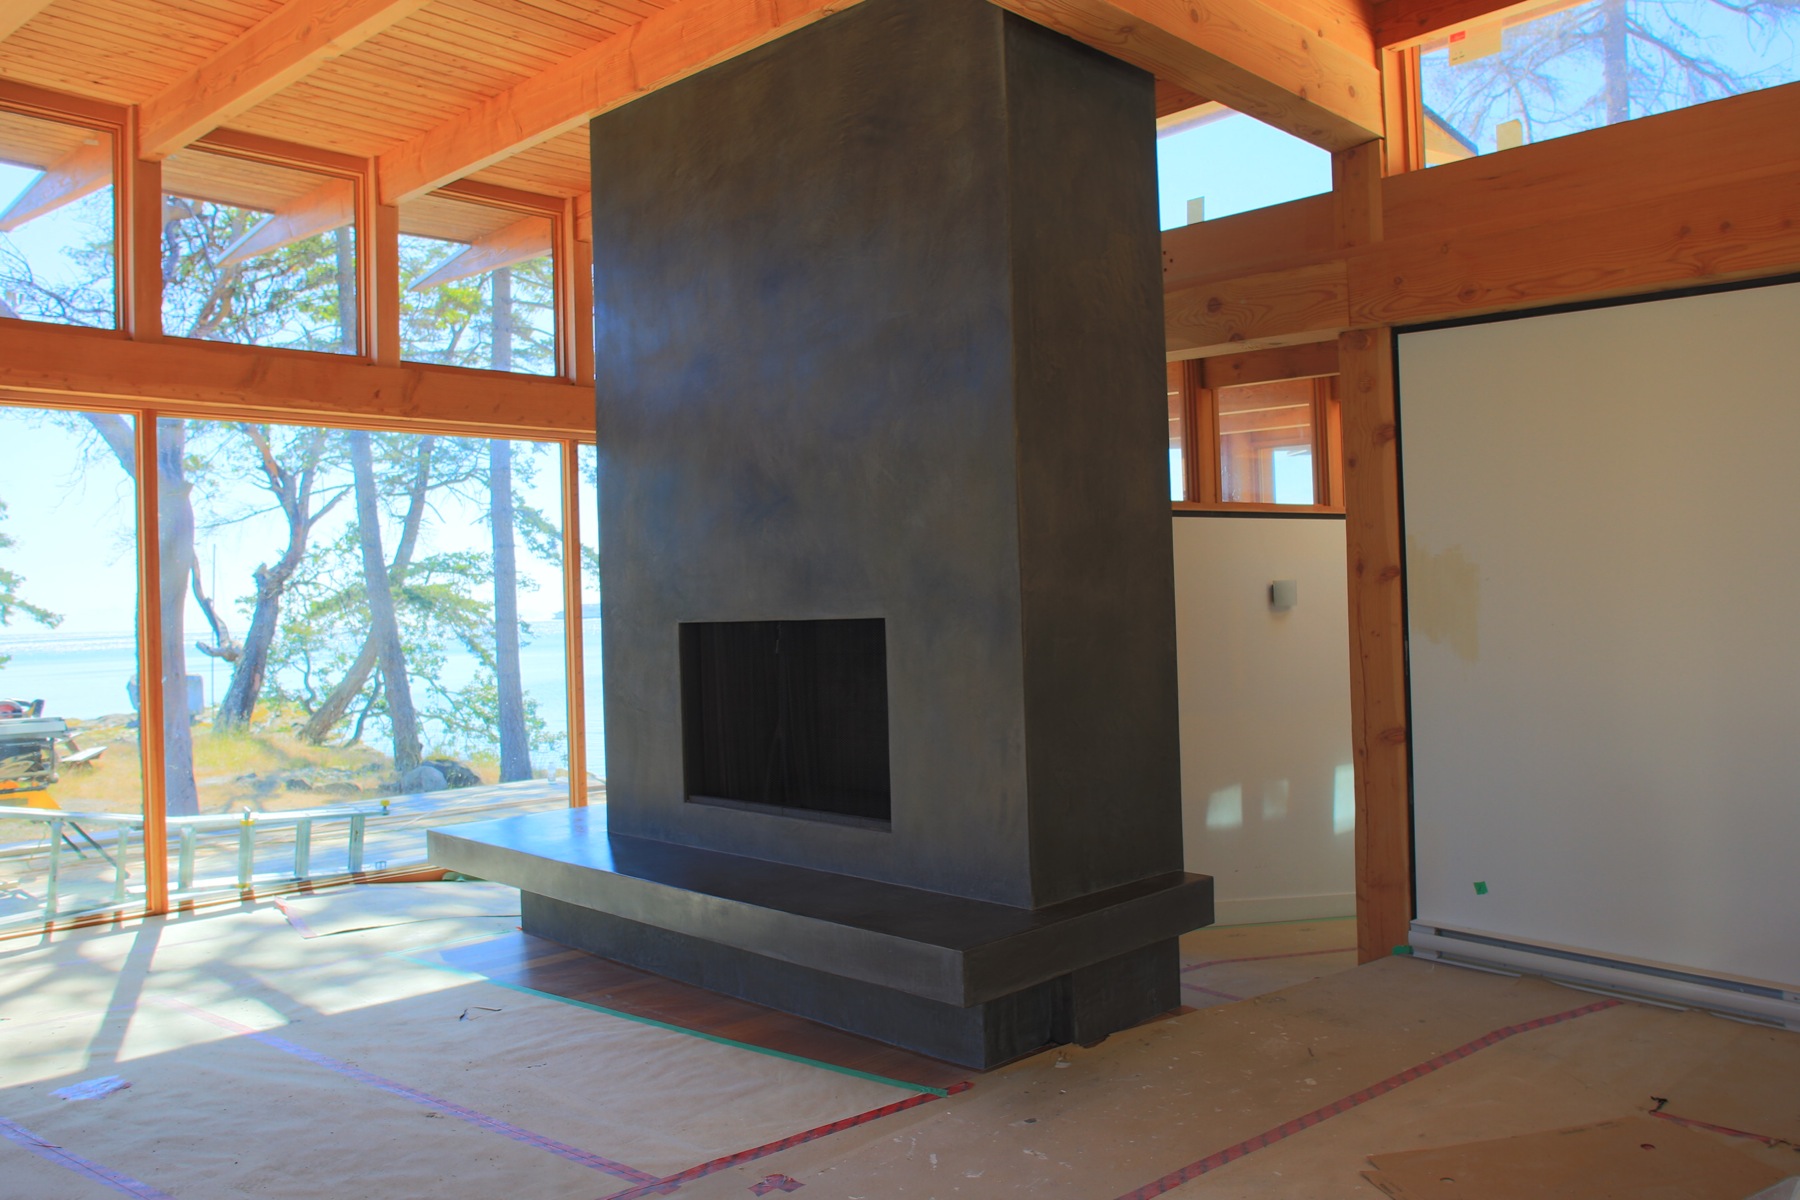
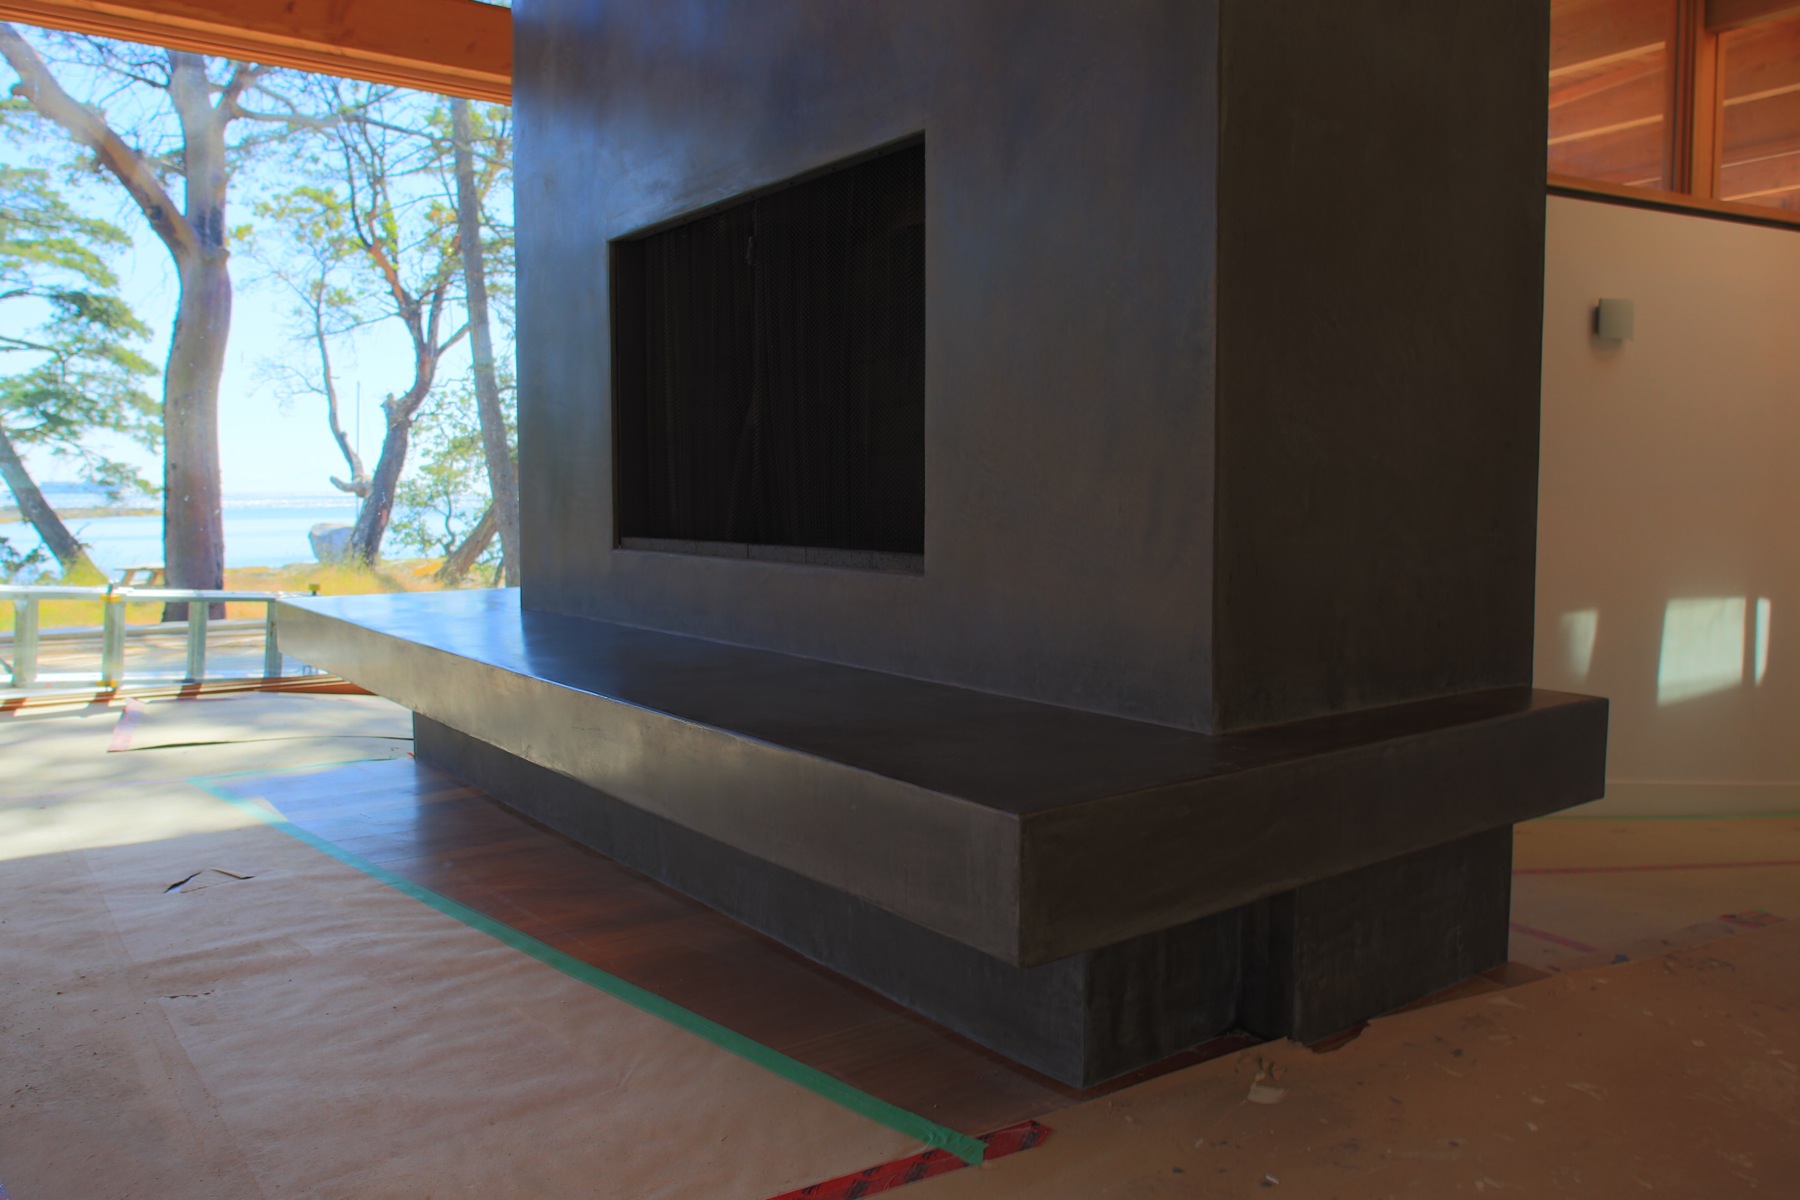
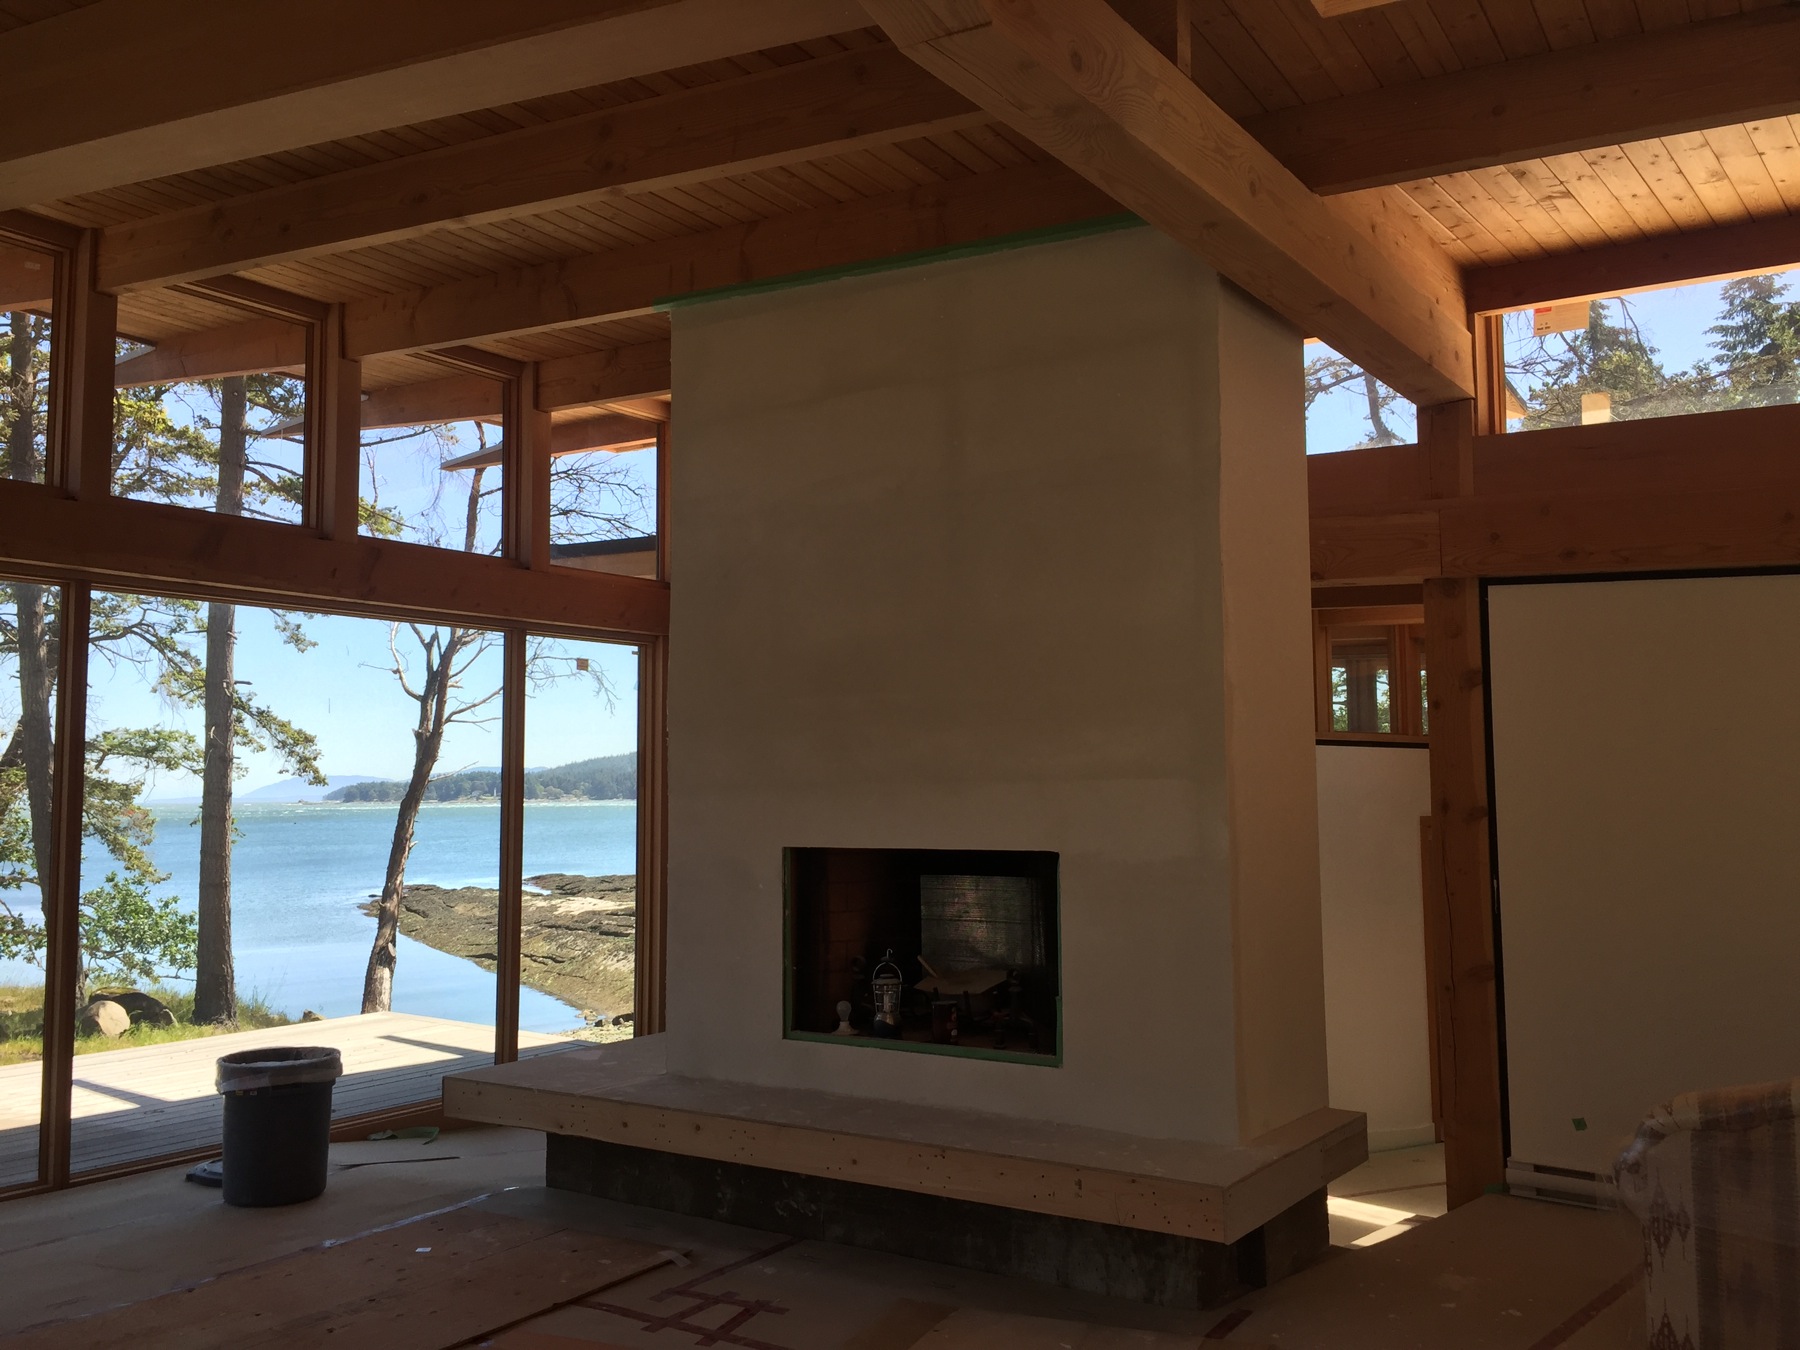
Tuscan Villa Italian Lime Plaster Exterior Vancouver, Canada


April 28th, 2013

We have been working on this Tuscan Villa in the country since last summer. With 3 decks, 40 pillars finished in a smooth polished tri-color Tadelakt. Fiber-crown mouldings installed by us and Lime painted to resemble real limestone and all the exterior walls are finished in Intonachino Italian Lime plaster.

This is how the project evolved while we worked there

[Post to Twitter]  [Post to Delicious]  [Post to Digg]  [Post to Facebook]  [Post to StumbleUpon] 

Italian Villa Tadelakt Full Interior Canada


December 19th, 2012

Here is one of the projects we have completed over the last year and since we completed this Tuscan Villa in Tadelakt, we designed over 19 different shades and formulations of finishes for this amazing Tuscan villa. The Tadelakt installation was not your normal install, as we created lots of texture and old world charm with the techniques. Working on this project was a true treat as I was able to express full creativity showcasing some of my best work and crazy ideas. Hope you enjoy these photos of a full interior in Ventian Lime based plaster.

Darrell Morrison Lime plaster wall art

Thanks for looking.

[Post to Twitter]  [Post to Delicious]  [Post to Digg]  [Post to Facebook]  [Post to StumbleUpon] 

Venetian Plaster Vancouver : “The Process, The Projects”


September 17th, 2012

The process, the projects, the finished product: This is an inside look into how I create my Venetian plaster projects, making them come alive.

In this video, you’ll see steps used to create my Venetian plaster projects, including completed project photos of Classic, Carrara, Intonachino and Tadelakt plaster applications.

When it comes to my projects, it’s Stucco Italiano Italian lime plaster that is my one and only choice, and I think this video shows you why. When you think interior stucco think Authentic lime based Venetian plaster.

[Post to Twitter]  [Post to Delicious]  [Post to Digg]  [Post to Facebook]  [Post to StumbleUpon] 

Italian Lime Plaster Full Exterior


May 4th, 2012

Its not everyday your dreams come true, this week for me they did. I have been dreaming of lime plastering this house for quite sometime and starting June 1st I get to do just that.

before

Not only are we Lime plastering this entire Tuscan villa, we also will be applying Tadelakt Lime plaster to all the columns and Lime painting all the fiber crown trim and moulding details of the full exterior. This home is going from new to old in a matter of a few months.

Be sure to check back in the coming weeks as this Italian lime plaster exterior unfolds

[Post to Twitter]  [Post to Delicious]  [Post to Digg]  [Post to Facebook]  [Post to StumbleUpon] 

Lime Plaster Vancouver Architecture & Interior Design


March 24th, 2012

What makes a beautiful Lime plaster finish so unique? In my opinion its the architecture and interior design taste of the clients. With clients in Burnaby, Vancouver, White Rock and all over the Lower Mainland, Architecture and Interior design is always changing. Lime plaster is the perfect material of choice that follows. Think custom fireplaces, feature walls or even full interiors Lime plaster projects.

Does your master bedroom have Architecture with curves like these? Italian Lime plaster is just the thing to bring these walls to life.

Does your style scream for a Tuscan Venetian plaster like this house?

Possibly you have a fireplace that has been needing the recent uplift. Could you dream of a sleek fireplace in Tadelakt Lime plaster?

[Post to Twitter]  [Post to Delicious]  [Post to Digg]  [Post to Facebook]  [Post to StumbleUpon] 

Lime Plaster In a Tuscan Style Villa


October 1st, 2011

Lime plaster has been my choice of material for almost a decade now. Recently someone told me it takes 10,000 hours to become proficient at any trade whether it be carpentry, framing or even a stone mason, the time spent honing that skill will one day make you a tradesman (or tradeswoman).

Over the summer I have been fortunate to work on a project in an Old World Italian Design Tuscan Villa. Breaking into my crate of techniques from WoodGrainingGoldLeafingVenetian Plastering, Lime Painting and Stencilling.   I have been challenged in ways that excite my mind and creativity, opening a new chapter in my life and the world I love to call Italian Plastering.

Here are some photos from this recent journey, the project is still in progress.

OldWorld Distress Exterior Wall

WoodGraining base coat

WoodGraining complete

Fibre Crown is a foam moulding used to simulate stone and in most situations is painted with acrylic paints.

Here is a close up of the foam moulding

Lime Painted Fibre Crown Moulding To Simulate The Look Of LimeStone

Fibre crown molding Lime stone 2 before & After

[Post to Twitter]  [Post to Delicious]  [Post to Digg]  [Post to Facebook]  [Post to StumbleUpon] 

Old World Italian Villa Finished In Tadelakt


September 1st, 2011

Tadelakt being used as a distressed old-world finish is not the norm for this material. While my supplier were out of stock I was forced to use this amazing material on a Tuscan Villa in the depths of Langley, Britsih Columbia.

What a treat it has been to learn the advantages of this amazing material and also a client and builder giving me full expresion of my work and creativity.

This is the 1st home I have Venetian Plastered that has 5 Juilet ballconies in the main hall, with one of the most amazing fireplaces I have ever seen. (That to come in the next post)

Here are some pictures from the start of the project

Powder Room Plaster finish

The house is still under major construction and I will share more as I find more time, bare with me the end of the summer is a real busy one.

Thanks for stopping by

Cheers
Darrell Morrison

[Post to Twitter]  [Post to Delicious]  [Post to Digg]  [Post to Facebook]  [Post to StumbleUpon] 

Tadelakt A Shower To Dream Of In Venetian Lime Plaster


May 28th, 2011

If you know me, you know I’m a busy guy. It’s work, work, work, these days, and when it’s not about work, it’s about time with my wife, my girl, and the pups.

Needless to say, like most of us, I seldom get to do the projects around the home that I dream of doing.

That all changed in the last month, because not only did I finally get to do a bit of home reno that my family gets to enjoy, but I also got to try something I’ve wanted to do for a really long time — a heavy-duty Italian venetian plaster treatment to a bathroom shower stall.

This work was done in our main-floor bathroom, which had been wanting TLC for a while.

Doing any project for the first time, especially when it’s a bathroom, can make it hard to estimate all the work involved, so getting a chance to explore the process on my own time was great.

It was a major project by the time I finished, as you can tell by the end results, but what did it take to get there?

Here’s how the Home Shower Venetian Plaster Project evolved, start to finish.

This ’70s bathroom came with tons of cedar, which all had to come down. Luckily, it was installed by someone who didn’t make much effort to do it right, so only a couple nails in each board ensured they popped right off. Removing the shoddy work made investing time in improving the room that much more satisfying.

The first thing I wanted to do was move the shower-head up by about two feet. No one wants to crouch for a shower.

Before now, I never had the need, or an opportunity, to work with copper. I decided I’d take a kick at the copper can instead of calling a plumber, and working with the pipes was easier than I expected. I might do the odd fix-it job here and there now, but I’d certainly never do my whole place.

Next, I installed plywood. I’m sure some of you building guys out there are wondering “why not concrete board instead of plywood?”

It’s a preference, really. I find plywood’s just easier to work with, and it comes in big old 4×8-foot sheets, making for less cutting in some situations, but, most importantly, I find plywood’s a big help when it comes to installing lath. (Shown later.)

Next up was installing the water-proof membrane. Obviously a quality project is needed for a shower, and I used a local company’s product, called, “SuperSeal” you can learn more about it here.


Then came the lath, and that installation was definitely a two-person job. Getting the lath stretched into and around corners took a lot of force and grunt-work. As we got through that, here’s how it got to looking:

Finally, after all that, it was time to do what I love best — the plastering! First, I slapped up two coats of concrete so there would be a ½-inch seamless base for the lime plaster to build upon. Concrete’s not a pretty project — it’s sloppy, and it made a mess of both a floor and me.


Then came the wait. It took a week — six whole sleeps! — of waiting for the concrete to fully cure, and then I finally got to start the really, really fun stuff — the tinted lime plaster.

I went for a rich, warm colour palette, which really stands up well in the space. Here’s how it looks:


Like most weekend do-it-yourself renos, I ran out of time and some finishing still needs doing on the rest of the details. One day, the countertop will get changed out, and clearly the white curtain needs to go. I just need some 30-hour days, maybe.

It was a fun adventure, one that pays off every time I walk in the room.

Is plaster something you’d consider for a bathroom now? There are a lot of good reasons to choose plaster over tile or other options, and I plan to share that with you in the coming weeks.

Until then, keep checking back — lots of big projects are ahead!

Cheers,
Darrell Morrison

[Post to Twitter]  [Post to Delicious]  [Post to Digg]  [Post to Facebook]  [Post to StumbleUpon] 

Italian Lime Plaster Interior In Banff, Alberta


November 12th, 2010

Early last Monday afternoon, I drove past a sign reading “Welcome to Banff, Alberta.”

Over the next three months, I’ll be working on an amazing, extremely customized home that backs onto Banff’s beautiful Bow River.

Along with everything else that blows me away about this house is the fact that I think it has the most stunning millwork I’ve ever encountered anywhere. Entering this amazing home felt like I’d just walked into some mind-blowing 5-star hotel in, well… Banff.

To add to the dramatic millwork and scenic setting, I’ll be using rich, deep earth-tone colours that complement the amazing nature all around us here in these legendary mountains. The plaster will be a 4-coat slightly-pitted Intonachino lime plaster finish.

The Canadian Rockies, where Banff is found, is known for its stone, exposed rockface, forests, and generally rugged terrain. I think this Italian lime plaster will really rock the Rockies, and it’ll be a commanding, dramatic feature in this impressive home as it stretches throughout the place, on all three levels.

I know this mountain town will be an amazing and inspiring place to work during the winter months. Come spring, if the owner converts the place into a “mountain stronghold,” it’ll be a beautiful place to hole up and easily forget about the rest of the world.

Banff is the highest town in Canada, sitting at an elevation of more than 4,500 feet (about 1,380 metres), nestled in the heart of the Canadian Rockies. It was declared Canada’s first national park in 1885, and today is a UNESCO World Heritage Site, with a protected area of more than 7,700 square miles.

The Bow River, which this home backs onto, originates from the Bow Glacier and Bow Lake. It flows for 587 kilometres, joins with the Oldman River to become the larger South Saskatchewan River, and eventually spills into Canada’s famous Hudson’s Bay, halfway across the country.

[Post to Twitter]  [Post to Delicious]  [Post to Digg]  [Post to Facebook]  [Post to StumbleUpon] 

TAH-DAH! The Tadelakt Fireplace


July 12th, 2010

It’s a good thing you hire me to do finish and not videos, because this one took me a year to make! What can I tell you? I’ve had spaces to make beautiful, but I finally found some time to share this one with you.

I’m pretty proud of this Tadelakt fireplace I completed last summer, so I’m glad I’ve finally got the video to post for you, including closeups, so you really get a good look at my work.

So, you ask why Tadelakt lime plaster was my first choice for this project?

This is a good lesson in why the material’s such an important consideration. You need to know the end look you want and what combination of products to use to get there. It’s tricky, and it’s why you need artisans who know their stuff but also know the kind of use it’s going to get, so both look-appropriate and wear-appropriate products are used.

All I can tell you is, out of all the styles of Venetian plaster I keep in my arsenal, it’s Tadelakt lime that brings the smooth, silky, and finely-honed “stone” appearance that makes it MY number-one choice for restoring a fireplace.

Personally, I also think it takes the mother-of-pearl finish the best, since it’s all about the smoothness of the finish.

It’s also really tough, so, Tadelakt really rocks in high-traffic, high-use areas like the fireplace.

I hope the film gives you that feeling, too, and gives you a good look at the detail I’m so proud of.

Cheers

Darrell  Morrison

[Post to Twitter]  [Post to Delicious]  [Post to Digg]  [Post to Facebook]  [Post to StumbleUpon] 

Next Page »