Integrated Italian Lime Plaster Fireplace from darrell morrison on Vimeo.
This clip shows you some of the fine details featured in my Venetian plaster style. In this architectural space, it was all about “Tuscan”.
To get that classic feel, we used Stucco Italiano, Intonachino, and Tadelakt. We’re industry specialists in these authentic lime plaster finishes, and I feel this video shows you exactly why. Enjoy!
Since early June, I’ve been working on this large full-interior lime plaster project. By “large,” I mean a whopping 10,000 square feet.
For me, I find it really amazing to see all the progress as I watch the Venetian plaster come together, and I thought I’d share some photos of the process so far, since I think you’ll like it.
This really is a massive project and something like this needs a lot of careful work even before it begins. With 10,000 square feet to dress up, it took a lot of colour-picking with the clients. We had eight colour changes and it was quite the struggle to nail the exact texture, but we stuck to the discussion until everyone was happy — something I don’t take lightly. I’m always up for making sure my clients have what they want on the palette before we get going. Isn’t that the whole point of the work? The client?
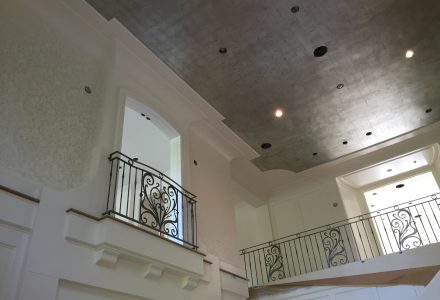
To start the project, I finished the ceilings off with Stucco Italiano’s Intonachino X-Fine because, with it, I could create the perfect amount of distressing in the texture.
We got the ceilings done before a final colour had been chosen for the walls. Was that a dilemma? Yup, you bet it was. We started on the walls anyhow, and the whole project slowed to a crawl because we could only basecoat the walls while I continued working towards the orangey-gold tones the client was after.
I find one of the tough things for clients is how to visualize the way things will look in the end. I’m an artist, I can visualize, but I understand why they can’t. Thankfully, technology’s starting to really make life simpler that way. I recently picked up an Apple iPad and loved how easy it made the client’s colour decision after I used it to highlight a few scenarios.
With my iPad, I pulled up some photos of both projects and concepts I thought would work well in this client’s space. I used it to show how using two colours can add a great deal of interest and movement on the walls. Doing all of this on a jobsite on a Sunday was a great deal of fun for me. I showed the client on the iPad, then jumped right into mixing a sample and showing the client how it all comes together in reality, right then and there.
With the iPad showing a wider vision and my skills showing the up-close in-person look, the colour and finish got approved, and here I am, already done with the main floor!
Here are some of the pictures of what’s happened so far, and I hope you enjoy them as much as the client does.
It’s a good thing you hire me to do finish and not videos, because this one took me a year to make! What can I tell you? I’ve had spaces to make beautiful, but I finally found some time to share this one with you.
I’m pretty proud of this Tadelakt fireplace I completed last summer, so I’m glad I’ve finally got the video to post for you, including closeups, so you really get a good look at my work.
So, you ask why Tadelakt lime plaster was my first choice for this project?
This is a good lesson in why the material’s such an important consideration. You need to know the end look you want and what combination of products to use to get there. It’s tricky, and it’s why you need artisans who know their stuff but also know the kind of use it’s going to get, so both look-appropriate and wear-appropriate products are used.
All I can tell you is, out of all the styles of Venetian plaster I keep in my arsenal, it’s Tadelakt lime that brings the smooth, silky, and finely-honed “stone” appearance that makes it MY number-one choice for restoring a fireplace.
Personally, I also think it takes the mother-of-pearl finish the best, since it’s all about the smoothness of the finish.
It’s also really tough, so, Tadelakt really rocks in high-traffic, high-use areas like the fireplace.
I hope the film gives you that feeling, too, and gives you a good look at the detail I’m so proud of.
Cheers
Darrell Morrison
In this renovation, the homeowner knew exactly what he wanted: A great living space with a lot of detail.
I’m not kidding, he left no corner out. Now that’s my kind of attention to detail!
I was commissioned to turn this doorway from “BLAH!” to “WOW!”
To do that, I chose to use Intonachino. I kicked it off with tinting the materials to a light orange/tan, using three colours to mix it from scratch: Raw Sienna, Red Oxide and Raw Umber (but the links are not the actual brands of the materials I use to tint my plaster; just great information pages for you to check out).
After, the finish was left to sit and cure for a few days before I returned to apply the all-important penetrating sealant before doing a beautiful raw umber glaze.
What do you think about this kind of finish?
In recent weeks, I’ve been lucky enough to be working in a lovely Greco-Roman home in Burnaby, BC.
It’s an awesome home, clearly designed for entertaining guests.
Well, when I first got out to the jobsite, the drywall wasn’t even installed. I’m a visual guy, but, for me, it’s difficult to get a sense of a home with all those studs and joists running up and down and everywhere. But, after awhile, I figured the home out, and I’m glad the project’s moving along.
We’re into the process now. Here, I was commissioned to install a distressed lime plaster finish, using something called Intonachino (in-tone-a-kino).
It kind of looks like it has a slight tint of yellow, but when paired up with the floor, it presents as a sand-beige. When I finish the project off, I’ll glaze the plaster with raw umber, adding a little character and an old, aged sense to the walls.
One of my favourite things to do on the job is when I get to take something old and outdated and reinvent it all new and awesome.
In October, I got to do exactly that to a 50-year-old sandstone fireplace.
Not only did I lower the height of the fireplace by a whole eight inches, but I also created baffles for the Heatilator’s vents.
The plaster I thought best for this job was Tadelakt, but I got tricky and added Mother-of-Pearl to make the finish a one-of-a-kind fireplace.
I hope you enjoy checking out the pictures.
We have had an amazing summer at Decorative Painting & Plastering Concepts and the fall is just beginning!!!! First off I must thank my clients for challenging me on their projects and giving me the opportunity to work with them. We spent a lot of time this spring marketing and teaching our clients about the benefits of Green and low V.O.C. materials not only has it been better for us and the environment but the advancements that companies like Benjamin Moore & Stucco Italiano have made make it possible for me as an applicator to provide the best quality materials and customer service knowing that they will hold up for years to come.
This is a photo of one of our recent full interior paint project in downtown Vancouver, it also included a custom metallic paint finish in the master bedroom and a custom Tadelakt pillar to match their existing Solus Stone Fireplace.
For this project the main goal was to repair the ceilings. There had been some major cracks cutting through in a straight line for sometime in this home after a major renovation. Now I know most people dread the thought of having to work above their head especially doing a Lime plaster finish. For me though its just another day at the office. I love ceilings, they have a feeling of a challenge like hiking a mountain or running in a marathon. You see when you start any venetian plaster finish their is no stopping you must complete the task. So if I am distressing a 300 square foot ceiling I have to complete it in that day. The beauty of this project was the creativity, I was able to come up with ideas like the rosettes, which added a great deal of architectural detail. I hope you enjoy the video.
Cheer’s
Darrell Morrison
If you would like to see the video in High Definition click this link
http://www.youtube.com/user/MorrisonDarrell
Welcome to my news letter. Inside you will find detailed information of my recent projects and favorite finishes. You can view it here
1. “Uniquely Daring” a subtle carrara marmorino feature wall
2. “Inspirational Thoughts” for you or your clients design ideas
3. Featured project “Diplomatic Immunity Clothing Inc. On South Granville, A classic white venetian plaster with a twist.
4. “The Grand Entrance” a full interior paint project in Tsawwassen including lots of wood finishing and wood graining a lost art.