


Tadelakt pillars inside and out, Fibercrown mouldings installed by and painted to resemble limestone. Italian lime plaster inside and out, antique mouldings, stencils, lath and plaster domes finished in silver leaf even the fountain base was finished by our hands. This house will be one to beat in our book of projects, a true masterpiece and an amazing group of people pulled this all together.
Italian Villa Lime Plaster Full Interior & Exterior Vancouver BC from darrell morrison on Vimeo.
Tadelakt pillars inside and out, Fibercrown mouldings installed by and painted to resemble limestone. Italian lime plaster inside and out, antique mouldings, stencils, lath and plaster domes finished in silver leaf even the fountain base was finished by our hands. This house will be one to beat in my book of projects, a true master piece and an amazing group of people pulled this all together.
-The Villa Work Performed-
-Exterior-
Two tone venetian lime plaster exterior
Install all fibercrown foam mouldings on exterior of house including arches windows and base.
Lime paint all mouldings to resemble lime stone
Tri-color Tadelakt lime plaster pillars
-Interior-
Smooth Venetian plaster walls including all ceilings and walls throughout house
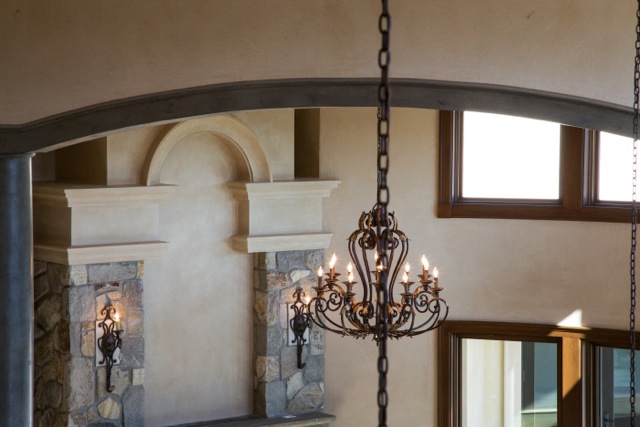
Main interior fireplace install fibercrown, float substrate plaster to resemble walls and carved limestone
Plaster pillars and arches in Tadelakt with glaze and wax for an aged look
All domes finished in lath and plaster then decorated with silver leaf.
All wood beams on interior wood grained


When I started this project I had no idea it would evolve into such an amazing opportunity to showcase my abilities as a business owner and a creative person. Working with the builder, designer and home owner every step of the way has had it challenges, but in the same right it has made the process fun, enjoyable and a great learning experience which I welcome. Learning new things everyday whether it be people related or plaster/job site related. I live to learn and grown.


Originally this projects exterior was going to get finished in a traditional exterior stucco and then faux painted to give it a similar effect as our Lime plaster. Having learned this I showed the builder my samples and mentioned plaster would be a far superior alliterative with less maintenance and a more authentic look then paint. So we got contracted to Italian lime plaster stucco the exterior of the entire house, Tadelakt Lime plaster all the exterior pillars and Lime paint all the exterior fibercrown mouldings. As the project progressed we eventually took over the installation of the fiber crown mouldings, which was a “massive” project on its own, with compound arches and pallets and pallets of mouldings to install it took close to 3 months just for that part of the project.
We are still currently working on this house getting close to completion on the interior which I will share a few photos of and the exterior which is nearing completion as well.


Here is one of the projects we have completed over the last year and since we completed this Tuscan Villa in Tadelakt, we designed over 19 different shades and formulations of finishes for this amazing Tuscan villa. The Tadelakt installation was not your normal install, as we created lots of texture and old world charm with the techniques. Working on this project was a true treat as I was able to express full creativity showcasing some of my best work and crazy ideas. Hope you enjoy these photos of a full interior in Ventian Lime based plaster.


Darrell Morrison Lime plaster wall art


Thanks for looking.
The process, the projects, the finished product: This is an inside look into how I create my Venetian plaster projects, making them come alive.
In this video, you’ll see steps used to create my Venetian plaster projects, including completed project photos of Classic, Carrara, Intonachino and Tadelakt plaster applications.
When it comes to my projects, it’s Stucco Italiano Italian lime plaster that is my one and only choice, and I think this video shows you why. When you think interior stucco think Authentic lime based Venetian plaster.

Lime plaster has been my choice of material for almost a decade now. Recently someone told me it takes 10,000 hours to become proficient at any trade whether it be carpentry, framing or even a stone mason, the time spent honing that skill will one day make you a tradesman (or tradeswoman).
Over the summer I have been fortunate to work on a project in an Old World Italian Design Tuscan Villa. Breaking into my crate of techniques from WoodGraining, GoldLeafing, Venetian Plastering, Lime Painting and Stencilling. I have been challenged in ways that excite my mind and creativity, opening a new chapter in my life and the world I love to call Italian Plastering.
Here are some photos from this recent journey, the project is still in progress.


WoodGraining base coat

WoodGraining complete

Fibre Crown is a foam moulding used to simulate stone and in most situations is painted with acrylic paints.

Here is a close up of the foam moulding

Lime Painted Fibre Crown Moulding To Simulate The Look Of LimeStone


Fibre crown molding Lime stone 2 before & After

Tadelakt being used as a distressed old-world finish is not the norm for this material. While my supplier were out of stock I was forced to use this amazing material on a Tuscan Villa in the depths of Langley, Britsih Columbia.
What a treat it has been to learn the advantages of this amazing material and also a client and builder giving me full expresion of my work and creativity.
This is the 1st home I have Venetian Plastered that has 5 Juilet ballconies in the main hall, with one of the most amazing fireplaces I have ever seen. (That to come in the next post)
Here are some pictures from the start of the project


Powder Room Plaster finish

The house is still under major construction and I will share more as I find more time, bare with me the end of the summer is a real busy one.
Thanks for stopping by
Cheers
Darrell Morrison
I remember my parents telling me their stories about how hard life was “back in the day,” when they’d have to slog through heavy snow, up snowy hills, all while braving the freezing weather. Now that I’m working in Banff, I can finally tell my daughter the same kinds of stories.
Except that my stories will involve my struggles this week — hauling some 2,650 pounds of Italian lime plaster up a snowy, icy hill, down some stairs to the lower level’s entrance, and all in chilly -14 degrees Celsius weather.
Yep, just another wintery day’s work in Banff, Alberta.


Laying down the base coat

There’s a reason they call short people “vertically challenged,” and my work in Venetian plaster and the constant need to do ceiling treatments means I’m proof of the “challenged” part.
Ladder, please!
I often need a little extra height, and that perfect height still means a world of work but a lot less pain!


Living and working in one of the mildest climates in Canada means I’ve never experienced the difficulties of building in high-altitude severe winter climate like that found here in Banff.
I’m enjoying seeing how different practices are needed for success here, and I’m super-impressed with how the builder deals with nature’s wrath, tenting exterior areas so the work on the home’s landscaping can continue throughout the season.


This is the exciting part, for me! Just last week, the main floor had barely any drywall hung. That was then and this is now! The build team has really pulled together, everyone’s always on the move, and they’re working as a team to get ‘er done. There’s a lot of good nature on the build site, with everyone being very friendly and communicating clearly, all things that are very important to me in a work environment.


It feels wrong to post without sharing another photo of the area. Here’s the town as we head to our lodgings after a day at the job site.

Banff is such a lovely place. I have so much more of it to experience while I’m here, and that’s really exciting. It’s not just a mountain town, it’s a winter wonderland, and it’s feeling like an epic journey’s just getting started. Thanks for following the experience!
Cheers,
Darrell Morrison
This Week’s Banff Trivia:
Geologists report that the Rocky Mountains that make up Banff National Park are 45 to 120 million years old. In just the national park alone, one can find more than 1,000 glaciers — but only if they wear really, really rugged hiking boots!
Early last Monday afternoon, I drove past a sign reading “Welcome to Banff, Alberta.”
Over the next three months, I’ll be working on an amazing, extremely customized home that backs onto Banff’s beautiful Bow River.
Along with everything else that blows me away about this house is the fact that I think it has the most stunning millwork I’ve ever encountered anywhere. Entering this amazing home felt like I’d just walked into some mind-blowing 5-star hotel in, well… Banff.
To add to the dramatic millwork and scenic setting, I’ll be using rich, deep earth-tone colours that complement the amazing nature all around us here in these legendary mountains. The plaster will be a 4-coat slightly-pitted Intonachino lime plaster finish.
The Canadian Rockies, where Banff is found, is known for its stone, exposed rockface, forests, and generally rugged terrain. I think this Italian lime plaster will really rock the Rockies, and it’ll be a commanding, dramatic feature in this impressive home as it stretches throughout the place, on all three levels.
I know this mountain town will be an amazing and inspiring place to work during the winter months. Come spring, if the owner converts the place into a “mountain stronghold,” it’ll be a beautiful place to hole up and easily forget about the rest of the world.


Banff is the highest town in Canada, sitting at an elevation of more than 4,500 feet (about 1,380 metres), nestled in the heart of the Canadian Rockies. It was declared Canada’s first national park in 1885, and today is a UNESCO World Heritage Site, with a protected area of more than 7,700 square miles.
The Bow River, which this home backs onto, originates from the Bow Glacier and Bow Lake. It flows for 587 kilometres, joins with the Oldman River to become the larger South Saskatchewan River, and eventually spills into Canada’s famous Hudson’s Bay, halfway across the country.
Now you’ll see I don’t exaggerate. I said this Tadelakt fireplace was massive? It was HUGE!
Stretching 16 feet across and with a towering peak of 11 feet, you can see why such a dominant feature made nailing the perfect colour the most important step in planning. But, hey, it’s always about “the perfect colour”.
Remember, I’ll always be happy to mix tints as often as it’s needed to make sure it’s a colour you’ll love living with well into the future.
Back to the massive fireplace: When you take a built-in entertainment centre/room feature and want to turn it into something bold and grand, while still adding value to your home, natural lime-based Venetian plaster is definitely the way to go. Remember that, it’s not just a cosmetic change — it’s adding value with beauty.
But, here, take a look for yourself.
“After”:
“Before”:

Here’s the soon-to-be Tadelakt fireplace. Mean, green… and wow! Could be a show-stopper if it’s finished right… but that’s why they hired me, because my company only does it “right”.
Our first step was building up the mantle for added size and drama, by using a 16-foot piece of 2×6 and some crown moulding. Et voila! There’s some beautiful architectural detail.


After finished beefing-up the mantle and the build was done, it was
time to figure out the posts for the bulk of the Tadelakt fireplace
application. This transformation really took it to the next level of
super-cool, don’t you think?

Look closely. Do you see both the bulk and pure “flow” those legs added? We felt it gave exactly the character needed to make this fireplace a feature to envy in an already-upscale neighbourhood.
Next came the real treat — doing the actual Tadelakt lime-plaster application. That’s when I get to feel like we’re putting icing on a cake. This, though, was a tricky cake.
You know me, I love a challenge. Personally, this profile was like nothing I had ever Venetian-plastered before. The detail, curves, and
difficulty reminded me of a lonely country road on a winter’s morning — a great pleasure to be on, but taking it slowly and carefully would
be essential, while knowing that patience would be rewarded with beauty.


Do you see how I used an orange mesh for tying the pieces together? This step is a massive pain, and really not a fun part of the project, but when it comes to a curved profile and the added degree of artistic difficulty that comes with it, that grief is worth the effort just for the extra years of architectural integrity it gives the project. It’s like your mom always told you, “Anything worth doing is worth doing right.” That’s how I operate, too.


Now the project is complete and the space has taken on a whole new look. It’s no longer a built-in piece of drywall, but a long-lasting element for the room, and a focus of the home that can be built upon for years. This fireplace will surely remain a strong selling point for as long as the home stands, because we built it to last.
I’m glad you popped in for a look at my recent work. Thanks for reading!
Cheers,
Darrell.
Office:: 604.628.7855 | Direct:: 604.779.4233 | 9am to 5pm Monday – Saturday
